This tutorial shows how to run an ASP.NET Core app in Docker containers.

In this tutorial, you:

  • Learn about Microsoft .NET Core Docker images
  • Download an ASP.NET Core sample app
  • Run the sample app locally
  • Run the sample app in Linux containers
  • Run the sample app in Windows containers
  • Build and deploy manually

Dockerfile:

1
2
3
4
5
6
7
8
9
10
11
12
13
14
15
16
17
FROM mcr.microsoft.com/dotnet/core/sdk:2.2 AS build
WORKDIR /app

# copy csproj and restore as distinct layers
# COPY *.sln .
COPY *.csproj .
RUN dotnet restore

# copy everything else and build app
COPY . ./aspnetapp/
WORKDIR /app/aspnetapp
RUN dotnet publish -c Release -o out

FROM mcr.microsoft.com/dotnet/core/aspnet:2.2 AS runtime
WORKDIR /app
COPY --from=build /app/aspnetapp/out ./
ENTRYPOINT ["dotnet", "mywebapi.dll"]

The sample Dockerfile uses the Docker multi-stage build feature to build and run in different containers. The build and run containers are created from images that are provided in Docker Hub by Microsoft:

dotnet/core/sdk

The sample uses this image for building the app. The image contains the .NET Core SDK, which includes the Command Line Tools (CLI). The image is optimized for local development, debugging, and unit testing. The tools installed for development and compilation make this a relatively large image.

dotnet/core/aspnet

The sample uses this image for running the app. The image contains the ASP.NET Core runtime and libraries and is optimized for running apps in production. Designed for speed of deployment and app startup, the image is relatively small, so network performance from Docker Registry to Docker host is optimized. Only the binaries and content needed to run an app are copied to the container. The contents are ready to run, enabling the fastest time from Docker run to app startup. Dynamic code compilation isn’t needed in the Docker model.

Run the app locally

1
2
3
4
# Build image
docker build -t mywebapi:latest .
# Run
docker run mywebapi

Push the image to the ACR

1
2
3
4
5
6
7
8
9
10
11
12
13
14
15
16
17
18
19
20
21
22
23
24
25
docker tag mywebapi loyaltycloud.azurecr.io/mywebapi:v2
docker push loyaltycloud.azurecr.io/mywebapi:v2
# Verify
az acr repository list --name loyaltycloud --output table
az acr repository show  -n loyaltycloud --repository mywebapi
{
  "changeableAttributes": {
    "deleteEnabled": true,
    "listEnabled": true,
    "readEnabled": true,
    "writeEnabled": true
  },
  "createdTime": "2020-05-14T10:11:06.3620347Z",
  "imageName": "mywebapi",
  "lastUpdateTime": "2020-05-14T11:59:35.8228843Z",
  "manifestCount": 2,
  "registry": "loyaltycloud.azurecr.io",
  "tagCount": 2
}

az acr repository show-tags  -n loyaltycloud --repository mywebapi
[
  "v1",
  "v2"
]

Adapt your Helm chart

Update appVersion to v2 in mywebapi/Chart.yaml. For example:

1
2
3
4
5
6
apiVersion: v2
name: mywebapi
...
# This is the version number of the application being deployed. This version number should be
# incremented each time you make changes to the application.
appVersion: v2

Run your Helm chart

1
2
3
4
5
6
7
8
9
10
11
12
13
14
15
16
helm install mywebapi mywebapi/ -n sfan
NAME: mywebapi
LAST DEPLOYED: Thu May 14 14:08:04 2020
NAMESPACE: sfan
STATUS: deployed
REVISION: 1
NOTES:
1. Get the application URL by running these commands:
     NOTE: It may take a few minutes for the LoadBalancer IP to be available.
           You can watch the status of by running 'kubectl get --namespace sfan svc -w mywebapi'
  export SERVICE_IP=$(kubectl get svc --namespace sfan mywebapi --template "")
  echo http://$SERVICE_IP:80
# Verify
kubectl -n sfan get services
NAME       TYPE           CLUSTER-IP     EXTERNAL-IP      PORT(S)        AGE
mywebapi   LoadBalancer   10.0.253.139   51.105.250.176   80:32301/TCP   40s

Trouble shoot

1
2
3
4
5
kubectl -n sfan get pods
NAME                        READY   STATUS             RESTARTS   AGE
mywebapi-554496fcc8-vgbw4   0/1     CrashLoopBackOff   6          6m17s
kubectl -n sfan describe pod

Upgrade applications with helm

1
2
3
4
5
6
7
8
9
10
11
12
13
14
15
16
17
18
19
20
21
22
23
24
25
26
# Current status
helm -n sfan list
NAME            NAMESPACE       REVISION        UPDATED                                 STATUS          CHART           APP VERSION
mywebapi        sfan            1               2020-05-14 14:08:04.86447333 +0200 CEST deployed        mywebapi-0.1.0  v2

# perform upgrading
helm -n sfan upgrade mywebapi ./mywebapi
Release "mywebapi" has been upgraded. Happy Helming!
NAME: mywebapi
LAST DEPLOYED: Thu May 14 14:44:43 2020
NAMESPACE: sfan
STATUS: deployed
REVISION: 2

# Verify
helm -n sfan list
NAME            NAMESPACE       REVISION        UPDATED                                         STATUS          CHART           APP VERSION
mywebapi        sfan            2               2020-05-14 14:44:43.143223606 +0200 CEST        deployed        mywebapi-0.1.0  v3

kubectl -n sfan get services
NAME       TYPE           CLUSTER-IP     EXTERNAL-IP      PORT(S)        AGE
mywebapi   LoadBalancer   10.0.253.139   51.105.250.176   80:32301/TCP   37m

kubectl -n sfan get pods
NAME                        READY   STATUS    RESTARTS   AGE
mywebapi-7d6c48f977-6lf5g   1/1     Running   0          49s

Uninstall helm chart

1
2
helm -n sfan uninstall mywebapi
helm -n sfan list

AKS Tutorial

Prepare an application for Azure Kubernetes Service

Docker Compose can be used to automate building container images and the deployment of multi-container applications.

Use the sample docker-compose.yaml file to create the container image, download the Redis image, and start the application:

1
2
3
4
5
6
docker-compose up -d

docker ps
CONTAINER ID        IMAGE               COMMAND                  CREATED              STATUS              PORTS                           NAMES
f31d08a79653        azure-vote-front    "/entrypoint.sh /sta…"   About a minute ago   Up About a minute   443/tcp, 0.0.0.0:8080->80/tcp   azure-vote-front
375538721eaf        redis               "docker-entrypoint.s…"   About a minute ago   Up About a minute   0.0.0.0:6379->6379/tcp          azure-vote-back

Stop and remove the container instances and resources with the docker-compose down command:

1
docker-compose down

When the local application has been removed, you have a Docker image that contains the Azure Vote application, azure-vote-front, for use with the next tutorial.

Deploy and use Azure Container Registry

Learning objective:

  • Create an Azure Container Registry (ACR) instance
  • Tag a container image for ACR
  • Upload the image to ACR
  • View images in your registry

Azure CLI change current subscription

1
2
3
4
5
6
7
8
9
az account set -h

Command
    az account set : Set a subscription to be the current active subscription.

Arguments
    --subscription -s [Required] : Name or ID of subscription.

az account set -s 91067109-d02e-4436-b81d-17500d1015de
1
2
3
4
5
6
7
8
9
10
11
12
13
14
15
16
17
18
19
20
21
# add yourself to the docker group, then restart your server/pc.
sudo usermod -a -G docker your-user-name

az acr list
# sudo az acr login --name loyaltycloud
az acr login --name loyaltycloud

# Tag a container image
sudo docker tag azure-vote-front loyaltycloud.azurecr.io/azure-vote-front:v1

# Push images to registry
docker push loyaltycloud.azurecr.io/azure-vote-front:v1

az acr repository list --name loyaltycloud --output table
az acr repository show  -n loyaltycloud --repository azure-vote-front
az acr repository show-tags  -n loyaltycloud --repository azure-vote-front

az acr repository show-tags  -n loyaltycloud --repository rewards-grpc
az acr repository show-manifests  -n loyaltycloud --repository rewards-grpc

az acr repository show-manifests  -n loyaltycloud --repository customers-grpc

Deploy an Azure Kubernetes Service (AKS) cluster

You learn how to:

  • Deploy a Kubernetes AKS cluster that can authenticate to an Azure container registry
  • Install the Kubernetes CLI (kubectl)
  • Configure kubectl to connect to your AKS cluster
1
2
3
4
5
6
7
8
9
10
11
# Install the Kubernetes CLI
sudo az aks install-cli

# List all the aks
az aks list -g loyalty-cloud-testing-resourcegroup

# Connect to cluster using kubectl
az aks get-credentials --resource-group loyalty-cloud-testing-resourcegroup --name loyalty-cloud-testing-cluster

# List the cluster nodes
kubectl get nodes

Run applications in Azure Kubernetes Service (AKS)

You learn how to:

  • Update a Kubernetes manifest file
  • Run an application in Kubernetes
  • Test the application
1
2
3
4
5
6
7
8
9
10
11
12
13
14
15
16
17
18
19
20
21
22
23
24
25
26
27
28
29
30
31
32
33
34
35
36
37
38
39
40
41
42
43
44
45
46
47
# Update the manifest file
vi azure-vote-all-in-one-redis.yaml
# Replace microsoft with your ACR login server name

# Deploy the application
kubectl apply -f azure-vote-all-in-one-redis.yaml

# Test the application
kubectl get service azure-vote-front --watch

kubectl get nodes
kubectl get services
kubectl get replicaset
kubectl get deployment
kubectl get pods
kubectl get secret
kubectl get daemonset
kubectl get ingress
kubectl get cronjob

# list all the resources from all namespaces
kubectl get services -a

# list all the resources under a certain namespace
kubectl -n demo get services
kubectl -n demo get nodes
kubectl -n demo get pods
kubectl -n demo get deployment
kubectl -n demo get secret
kubectl -n demo get replicaset
kubectl -n demo get daemonset
kubectl -n demo get ingress
kubectl -n demo get cronjob

# Update your app manually via kubectl
kubectl -n lc-demo set image deployments/rewards-grpc-v1 rewards-grpc=loyaltycloud.azurecr.io/rewards-grpc@sha256:a0688453080e6715b8486625a8a12888418d35b4b3918519ef0b327396f75ae3
deployment.extensions/rewards-grpc-v1 image updated

kubectl -n lc-demo rollout status deployments/rewards-grpc-v1
deployment "rewards-grpc-v1" successfully rolled out

kubectl -n lc-demo rollout history deployments/rewards-grpc-v1
deployment.extensions/rewards-grpc-v1 
REVISION  CHANGE-CAUSE
1         <none>
2         <none>
3         <none>

Scale applications

You learn how to:

  • Scale the Kubernetes nodes
  • Manually scale Kubernetes pods that run your application
  • Configure autoscaling pods that run the app front-end

Manually scale pods

1
2
3
kubectl get pods
kubectl scale --replicas=3 deployment/azure-vote-front

Autoscale pods

To use the autoscaler, all containers in your pods and your pods must have CPU requests and limits defined. In the azure-vote-front deployment, the front-end container already requests 0.25 CPU, with a limit of 0.5 CPU. These resource requests and limits are defined as shown in the following example snippet:

1
2
3
4
5
resources:
  requests:
     cpu: 250m
  limits:
     cpu: 500m

The following example uses the kubectl autoscale command to autoscale the number of pods in the azure-vote-front deployment. If average CPU utilization across all pods exceeds 50% of their requested usage, the autoscaler increases the pods up to a maximum of 10 instances. A minimum of 3 instances is then defined for the deployment:

1
kubectl autoscale deployment azure-vote-front --cpu-percent=50 --min=3 --max=10

Update an application

You learn how to:

  • Update the front-end application code
  • Create an updated container image
  • Push the container image to Azure Container Registry
  • Deploy the updated container image
1
2
3
4
5
6
7
8
9
10
11
12
13
14
15
16
17
18
19
20
21
22
23
24
25
26
27
28
29
30
31
32
33
34
# Update the container image
docker-compose up --build -d

# Tag and push the image
docker tag azure-vote-front loyaltycloud.azurecr.io/azure-vote-front:v2
docker push loyaltycloud.azurecr.io/azure-vote-front:v2

# Deploy the updated application
kubectl get pods

kubectl set image deployment azure-vote-front azure-vote-front=loyaltycloud.azurecr.io/azure-vote-front:v2

# Verify
kubectl get pods
NAME                                READY   STATUS              RESTARTS   AGE
azure-vote-back-5775d78ff5-98rls    1/1     Running             0          16h
azure-vote-front-58869f478c-db5xw   1/1     Running             0          13s
azure-vote-front-58869f478c-f2tzt   0/1     ContainerCreating   0          4s
azure-vote-front-58869f478c-p65vl   1/1     Running             0          13s
azure-vote-front-5b4f7cc4f8-9cml7   0/1     Terminating         0          16h
azure-vote-front-5b4f7cc4f8-bgdhb   1/1     Terminating         0          16h

kubectl get pods
NAME                                READY   STATUS    RESTARTS   AGE
azure-vote-back-5775d78ff5-98rls    1/1     Running   0          16h
azure-vote-front-58869f478c-db5xw   1/1     Running   0          51s
azure-vote-front-58869f478c-f2tzt   1/1     Running   0          42s
azure-vote-front-58869f478c-p65vl   1/1     Running   0          51s

kubectl get replicaset
NAME                          DESIRED   CURRENT   READY   AGE
azure-vote-back-5775d78ff5    1         1         1       16h
azure-vote-front-58869f478c   3         3         3       2m27s
azure-vote-front-5b4f7cc4f8   0         0         0       16h

Upgrade Kubernetes cluster

As part of the application and cluster lifecycle, you may wish to upgrade to the latest available version of Kubernetes and use new features. An Azure Kubernetes Service (AKS) cluster can be upgraded using the Azure CLI.

In this tutorial, part seven of seven, a Kubernetes cluster is upgraded. You learn how to:

  • Identify current and available Kubernetes versions
  • Upgrade the Kubernetes nodes
  • Validate a successful upgrade
1
2
3
4
5
6
7
8
# Get available cluster versions
az aks get-upgrades --resource-group loyalty-cloud-testing-resourcegroup --name loyalty-cloud-testing-cluster --output=table

# Upgrade
az aks upgrade --resource-group myResourceGroup --name myAKSCluster --kubernetes-version 1.16.5

# Verify
az aks show --resource-group loyalty-cloud-testing-resourcegroup --name loyalty-cloud-testing-cluster --output table

Cloud types and service models in Azure

Learning objectives

In this module, you will:

  • Compare each cloud computing deployment model (public, private, and hybrid).
  • Understand the advantages of each cloud computing service model.
  • Decide which deployment and service model you should use for your services.

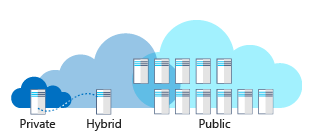
There are three deployment models for cloud computing: public cloud, private cloud, and hybrid cloud. The following illustration shows an overview of these deployment models.

deployment models

Cloud service models

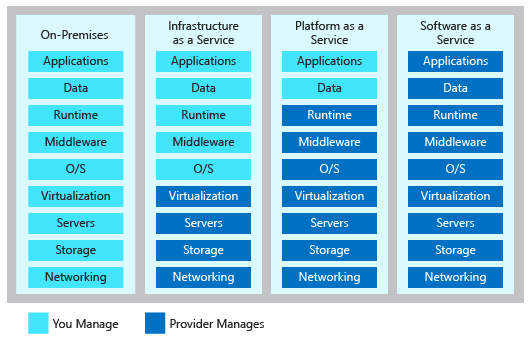
Cloud computing resources are delivered using three different service models.

  • Infrastructure-as-a-service (IaaS) provides instant computing infrastructure that you can provision and manage over the Internet.
  • Platform as a service (PaaS) provides ready-made development and deployment environments that you can use to deliver your own cloud services.
  • Software as a service (SaaS) delivers applications over the Internet as a web-based service.

XaaS

Control Azure services with the CLI

In this module, you will:

  • Install the Azure CLI on Linux, macOS, and/or Windows
  • Connect to an Azure subscription using the Azure CLI
  • Create Azure resources using the Azure CLI

Using the Azure CLI in scripts

If you want to use the Azure CLI commands in scripts, you need to be aware of any issues around the “shell” or environment used for running the script. For example, in a bash shell, the following syntax is used when setting variables:

1
2
variable="value"
variable=integer

Work with the Azure CLI

The Azure CLI lets you control nearly every aspect of every Azure resource. You can work with resource groups, storage, virtual machines, Azure Active Directory (Azure AD), containers, machine learning, and so on.

how do you find the particular commands you need? One way is to use az find, the AI robot that uses the Azure documentation to tell you more about commands, the CLI and more.

Example - find the most popular commands related to the word blob.

1
2
3
4
5
6
7
8
9
10
11
12
13
14
15
16
17
18
19
20
21
22
23
24
25
26
27
az find blob
Finding examples...

Here are the most common ways to use [blob]: 

Delete a blob.
az storage blob delete --container-name MyContainer --name MyBlob

Upload to a blob.
az storage blob upload --file /path/to/file --container-name MyContainer --name MyBlob

Get the details of a blob (autogenerated)
az storage blob show --account-name MyAccount --container-name MyContainer --name MyBlob

az find "az vm create"
Finding examples...

Here are the most common ways to use [az vm create]: 

Create a default Ubuntu VM with automatic SSH authentication.
az vm create --name MyVm --resource-group MyResourceGroup --image UbuntuLTS

Create a default Windows Server VM with a private IP address.
az vm create --name MyVm --resource-group MyResourceGroup --public-ip-address "" --image Win2012R2Datacenter

Create a VM by attaching to a managed operating system disk.
az vm create --resource-group MyResourceGroup --name MyVm --attach-os-disk MyOsDisk --os-type linux

If you already know the name of the command you want, the –help argument for that command will get you more detailed information on the command.

1
2
3
4
5
6
7
8
9
10
11
12
13
14
15
16
17
18
19
20
21
22
23
24
25
26
27
28
29
30
31
32
33
34
35
36
37
38
39
az storage blob --help

Group
    az storage blob : Manage object storage for unstructured data (blobs).
        Please specify one of the following authentication parameters for your commands: --auth-
        mode, --account-key, --connection-string, --sas-token. You also can use corresponding
        environment variables to store your authentication credentials, e.g. AZURE_STORAGE_KEY,
        AZURE_STORAGE_CONNECTION_STRING and AZURE_STORAGE_SAS_TOKEN.

Subgroups:
    copy               : Manage blob copy operations. Use `az storage blob show` to check the status
                         of the blobs.
    incremental-copy   : Manage blob incremental copy operations.
    lease              : Manage storage blob leases.
    metadata           : Manage blob metadata.
    service-properties : Manage storage blob service properties.

Commands:
    delete             : Mark a blob or snapshot for deletion.
    delete-batch       : Delete blobs from a blob container recursively.
    download           : Downloads a blob to a file path, with automatic chunking and progress
                         notifications.
    download-batch     : Download blobs from a blob container recursively.
    exists             : Check for the existence of a blob in a container.
    generate-sas       : Generate a shared access signature for the blob.
    list               : List blobs in a given container.
    restore  [Preview] : Restore blobs in the specified blob ranges.
    set-tier           : Set the block or page tiers on the blob.
    show               : Get the details of a blob.
    snapshot           : Creates a read-only snapshot of a blob.
    sync     [Preview] : Sync blobs recursively to a storage blob container.
    undelete           : The undelete Blob operation restores the contents and metadata of soft
                         deleted blob or snapshot.
    update             : Sets system properties on the blob.
    upload             : Upload a file to a storage blob.
    upload-batch       : Upload files from a local directory to a blob container.
    url                : Create the url to access a blob.

For more specific examples, use: az find "az storage blob"

How to create an Azure resource

When creating a new Azure resource, there are typically three steps: connect to your Azure subscription, create the resource, and verify that creation was successful. The following illustration shows a high-level overview of the process.

illustration

1
2
3
4
5
6
7
8
9
10
# Connect
az login

# Create
az group create --name <name> --location <location>

# Verify
az group list

az group list --output table

Create an Azure website using the CLI

Next, let’s use the Azure CLI to create a resource group, and then to deploy a web app into this resource group.

1
2
3
4
5
6
7
8
9
10
11
12
13
14
15
16
17
18
19
20
21
22
23
24
# create several variables that you will use in later commands
export RESOURCE_GROUP=learn-3e235359-ef6b-4932-a452-af72a7642a6c
export AZURE_REGION=centralus
export AZURE_APP_PLAN=popupappplan-$RANDOM
export AZURE_WEB_APP=popupwebapp-$RANDOM

# create a service plan
az appservice plan create --name $AZURE_APP_PLAN --resource-group $RESOURCE_GROUP --location $AZURE_REGION --sku FREE

# Verify
az appservice plan list --output table

# create a web app
az webapp create --name $AZURE_WEB_APP --resource-group $RESOURCE_GROUP --plan $AZURE_APP_PLAN

# Verify
curl $AZURE_WEB_APP.azurewebsites.net

# deploy code from GitHub
az webapp deployment source config --name $AZURE_WEB_APP --resource-group $RESOURCE_GROUP --repo-url "https://github.com/Azure-Samples/php-docs-hello-world" --branch master --manual-integration

# hit your site again with a browser or CURL
curl $AZURE_WEB_APP.azurewebsites.net

Summary

The Azure CLI is a good choice for anyone new to Azure command line and scripting. Its simple syntax and cross-platform compatibility help reduce the risk of errors when performing regular and repetitive tasks. In this module, you used the Azure CLI commands to create a resource group, and deploy a web app by using a small set of commands. These commands could be combined into a shell script as part of automation solution.